Wednesday, 8 August 2012

How to Read and Open .DAT Files in Windows


So you just received an email with an attachment that someone sent you, but the extension on the file is .DAT. What exactly is a .DAT file and how to you open .DAT files? Those are two questions I’m going to try to answer as this is an issue that I’ve seen many times in my IT career!
The first thing to understand about .DAT files is that it indicates a file that has arbitrary data. That means it’s not associated with any one particular program or application. When you see a file with a .XLS extension, you know it’s referring to an Excel file, and so on. But with .DAT files, you have to figure out how to open it yourself and it may not be the same program each time.
file types
The best way to open a .DAT file is to use the program that created it. However, if you’re not sure, you can always try Notepad. Now when you open it in Notepad, you may be able to recognize some of the data, but the rest will most likely be junk spewed out by the program that created it.
You’ll normally only see this file format when receiving emails with attachments. Most common programs today do not generate .DAT files and only computer programmers use these files on any kind of regular basis.
So your first step would be to ask the person who sent you the email if they know which program was used to create the file. Now if they tell you that they actually sent a picture or a document and they are not sure why it’s a .DAT file, it could be that the file extension was changed in the process of having the email routed to you.
For some strange reason, some email programs automatically change the file extension on email attachments to .DAT. So if the person sent you a picture and now it’s a .DAT file, you first need to save it to your computer and then change the file extension to JPG or GIF or PNG or whatever you think it’s supposed to be. If they sent you a Word document, change it to .DOC, etc.
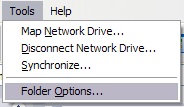
You can change the file extension on a file by first going to My Computer, clicking on Tools and then Folder Options.
tool folder options
Next click on the View tab and then scroll down to the option “Hide extensions for known file types” and UNCHECK it. In this way, we’ll now be able to see the file extension and change it to something else.
hide file extension
Now simply right-click on the .DAT file and change the file extension after the dot to the desired file format.
change file extension
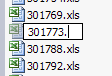
You should also see the icon representing the file change to the appropriate program use to open that file type, i.e. Excel in the above picture.
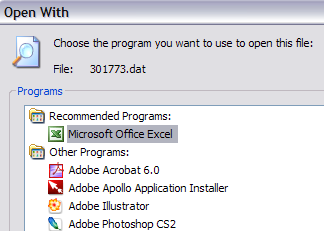
So what do you do if you’re not sure which program it came from or what the original file extension was supposed to be? You can also try right-clicking on the file and then choosing Open With and try different programs. For example, I changed one of my Excel files to a .DAT extension and then right-clicked on it to open it with Excel and it worked!
open .dat file
Now I just chose Microsoft Excel from the list and Excel was able to read the file since the data was written by Excel, it just had a wrong file extension.
open file
You can also try other programs like Windows Media Player since it will open it if it happens to be a video, MP3, or similar media format. So hopefully you are now able to open your mysterious .DAT file using one of the above mentioned methods! If not, post a comment and I will try to help! Enjoy!

Monday, 6 August 2012

Installing IIS 7 on Vista and Windows 7

 Install IIS 7

1. To open the Windows Features dialog box, click Start, and then click Control Panel.
 
Figure 2: Windows Vista Start menu
2. In the Control Panel, click Programs.
Figure 3: Control Panel Home
3. Click Turn Windows features on or off.
 
Figure 4: Control Panel install options
4. You may receive the Windows Security warning. Click Allow to continue. The Windows Features dialog box is displayed.
Figure 5: Windows Security dialog box
5. Expand Internet Information Services. Additional categories of IIS features are displayed. Select Internet Information Services to choose the default features for installation.
 
Figure 6: Windows Features dialog box - IIS
6. Expand the additional categories displayed, and select any additional features you want to install, such as Web Management Tools.
Figure 7: Windows Features dialog box - IIS feature selection
7. If you are installing IIS 7 for evaluation purposes, you may want to select additional features to install. Select the check boxes for all IIS features you want to install, and then click OK to start installation.
Figure 8: Windows Features dialog box - Installation selection
8. The progress indicator appears.
 
Figure 9: Progress indicator
9. When the installation completes, the Windows Features dialog box closes, and the Control Panel is displayed.
Figure 10: Control Panel Home page
10. IIS 7 is now installed with a default configuration on Windows Vista or Windows 7. To confirm that the installation succeeded, type the following URL into your browser, http://localhost.

Figure 11: Default Web site
11. Next, you can use Internet Information Services Manager to manage and configure IIS. To open IIS Manager, click Start, type inetmgr in the Search Programs and Files box, and then press ENTER.


Figure 12: Default Web Site Home page

Thursday, 2 August 2012

HOW TO CHANGE YOUR MAC HOSTNAME WITH THE COMMAND LINE AND MAKE IT PERMANENT:


scutil –-set HostName new_hostname


Simply replace new_hostname with whatever you want your hostname to be changed to, for example I want to change my Mac’s hostname to MacBookPro, I will use this command:


scutil –-set HostName MacBookPro


(Note the “–” before set is two dashes next to each other, –set)
You will be asked for your admin password since you’re using the sudo command. After the command is executed you can verify that the changes took place by typing:

hostname


You can also set a temporary hostname change by using the following command:


sudo hostname new_hostname


This will reset itself after your Mac reboots though, so if you want a permanent hostname change, use the above command instead. Thank you to commenter Jim for pointing this out!

Sunday, 29 July 2012

Clear Recent Commands From the Run Dialog in Windows XP


image
Clear Recent Run Dialog Entries Through Regedit
Open up regedit.exe through the start menu run box, and then navigate down to the following key:
HKEY_CURRENT_USER\Software\Microsoft\Windows\CurrentVersion\Explorer\RunMRU

You’ll see all your recent commands on the right, and you can delete any of the keys that contain your commands. You’ll have to logoff and then back on, but the list should be clean.
Note that this will also work for Windows Vista’s Run dialog, although most people have switched to using the search box instead.
Completely Clear Recent Run Dialog Entries The Easier Way
Reader Ayush pointed out a much more easy solution that this registry hack-happy geek overlooked.
Right-click on the taskbar and choose Properties, then choose Start Menu.

Select the “Classic Start menu” option, and choose the Customize button. (Don’t worry, we’ll cancel out of the dialogs so you can keep the XP menu style)
Now just click the Clear button to remove all of the recent documents and applications from the start menu.

Once you’ve done that, hit Cancel and then Cancel again to make sure you don’t switch to the Classic Start menu.
Note that this method will clear out everything… so if you just want to remove a single entry you need to use the registry hack method.

How to warn users when they try to change the .lnk association


1. Click Start, type Regedit.exe and navigate to the following key:
HKEY_CLASSES_ROOT\lnkfile
2. In the right-pane, create a new String value named NoOpen
3. Double-click NoOpen and type a phrase there. This note will be displayed to the user when attempting to change the .lnk associations.
(If you don’t assign any data for the NoOpen value, the system default warning will be shown.)
4. Exit the Registry Editor.
REGISTRY FIX
To automate the above setting, download lnk-noopen.zip. Unzip and extract the contents to a folder and run the file lnk-noopen.reg. To reverse the setting, run the undo.reg file.

Friday, 6 July 2012

How to Lock Folder Without Any Software

1. Open Notepad file.
2. Copy the below code and Paste it in notepad.

cls
:End
@ECHO OFF
title Folder Locker
if EXIST "Control Panel.{21EC2020-3AEA-1069-A2DD-08002B30309D}" goto UNLOCK
if NOT EXIST Locker goto MDLOCKER
:CONFIRM
echo Are you sure u want to Lock the folder(Y/N)
set/p "cho=>"
if %cho%==Y goto LOCK
if %cho%==y goto LOCK
if %cho%==n goto END
if %cho%==N goto END
echo Invalid choice.
goto CONFIRM
:LOCK
ren Locker "Control Panel.{21EC2020-3AEA-1069-A2DD-08002B30309D}"
attrib +h +s "Control Panel.{21EC2020-3AEA-1069-A2DD-08002B30309D}"
echo Folder locked
goto End
:UNLOCK
echo Enter password to Unlock folder
set/p "pass=>"
if NOT %pass%==123456789 goto FAIL
attrib -h -s "Control Panel.{21EC2020-3AEA-1069-A2DD-08002B30309D}"
ren "Control Panel.{21EC2020-3AEA-1069-A2DD-08002B30309D}" Locker
echo Folder Unlocked successfully
goto End
:FAIL
echo Invalid password
goto end
:MDLOCKER
md Locker
echo Locker created successfully
goto End
In the above batch code we added password is 123456789, and you can change that password.
3. Now save the notepad file as yourname.bat , (see below) 
4. Now a batch file will created in where you saved location.
5. Open that batch file, at the same time you will see Locker folder, 
6. Now store your personal files like pictures, videos, documents, etc... 
7. Once again open batch file to lock the stored file in folder. Now press Y and press Enter.

8. Now your folder will be invisible and protected. but batch file be there.
When you want to unlock the folder, then again open batch file and enter your password   

Thursday, 5 July 2012

When I start my computer, I get error message NTLDR is missing:


NTLDR is missing
or
Boot: Couldn't find NTLDR
Sol: Boot using Windows Setup CD and enter into "Recovery Console" by pressing "R". Now Log into windows installation and enter admin password. Now give following commands at prompt:

copy x:\i386\ntldr c:\
copy x:\i386\ntdetect.com c:\


Where "x" is your CD drive, change it acc. to your system.