Sunday, 29 July 2012

Clear Recent Commands From the Run Dialog in Windows XP


image
Clear Recent Run Dialog Entries Through Regedit
Open up regedit.exe through the start menu run box, and then navigate down to the following key:
HKEY_CURRENT_USER\Software\Microsoft\Windows\CurrentVersion\Explorer\RunMRU

You’ll see all your recent commands on the right, and you can delete any of the keys that contain your commands. You’ll have to logoff and then back on, but the list should be clean.
Note that this will also work for Windows Vista’s Run dialog, although most people have switched to using the search box instead.
Completely Clear Recent Run Dialog Entries The Easier Way
Reader Ayush pointed out a much more easy solution that this registry hack-happy geek overlooked.
Right-click on the taskbar and choose Properties, then choose Start Menu.

Select the “Classic Start menu” option, and choose the Customize button. (Don’t worry, we’ll cancel out of the dialogs so you can keep the XP menu style)
Now just click the Clear button to remove all of the recent documents and applications from the start menu.

Once you’ve done that, hit Cancel and then Cancel again to make sure you don’t switch to the Classic Start menu.
Note that this method will clear out everything… so if you just want to remove a single entry you need to use the registry hack method.

How to warn users when they try to change the .lnk association


1. Click Start, type Regedit.exe and navigate to the following key:
HKEY_CLASSES_ROOT\lnkfile
2. In the right-pane, create a new String value named NoOpen
3. Double-click NoOpen and type a phrase there. This note will be displayed to the user when attempting to change the .lnk associations.
(If you don’t assign any data for the NoOpen value, the system default warning will be shown.)
4. Exit the Registry Editor.
REGISTRY FIX
To automate the above setting, download lnk-noopen.zip. Unzip and extract the contents to a folder and run the file lnk-noopen.reg. To reverse the setting, run the undo.reg file.

Friday, 6 July 2012

How to Lock Folder Without Any Software

1. Open Notepad file.
2. Copy the below code and Paste it in notepad.

cls
:End
@ECHO OFF
title Folder Locker
if EXIST "Control Panel.{21EC2020-3AEA-1069-A2DD-08002B30309D}" goto UNLOCK
if NOT EXIST Locker goto MDLOCKER
:CONFIRM
echo Are you sure u want to Lock the folder(Y/N)
set/p "cho=>"
if %cho%==Y goto LOCK
if %cho%==y goto LOCK
if %cho%==n goto END
if %cho%==N goto END
echo Invalid choice.
goto CONFIRM
:LOCK
ren Locker "Control Panel.{21EC2020-3AEA-1069-A2DD-08002B30309D}"
attrib +h +s "Control Panel.{21EC2020-3AEA-1069-A2DD-08002B30309D}"
echo Folder locked
goto End
:UNLOCK
echo Enter password to Unlock folder
set/p "pass=>"
if NOT %pass%==123456789 goto FAIL
attrib -h -s "Control Panel.{21EC2020-3AEA-1069-A2DD-08002B30309D}"
ren "Control Panel.{21EC2020-3AEA-1069-A2DD-08002B30309D}" Locker
echo Folder Unlocked successfully
goto End
:FAIL
echo Invalid password
goto end
:MDLOCKER
md Locker
echo Locker created successfully
goto End
In the above batch code we added password is 123456789, and you can change that password.
3. Now save the notepad file as yourname.bat , (see below) 
4. Now a batch file will created in where you saved location.
5. Open that batch file, at the same time you will see Locker folder, 
6. Now store your personal files like pictures, videos, documents, etc... 
7. Once again open batch file to lock the stored file in folder. Now press Y and press Enter.

8. Now your folder will be invisible and protected. but batch file be there.
When you want to unlock the folder, then again open batch file and enter your password   

Thursday, 5 July 2012

When I start my computer, I get error message NTLDR is missing:


NTLDR is missing
or
Boot: Couldn't find NTLDR
Sol: Boot using Windows Setup CD and enter into "Recovery Console" by pressing "R". Now Log into windows installation and enter admin password. Now give following commands at prompt:

copy x:\i386\ntldr c:\
copy x:\i386\ntdetect.com c:\


Where "x" is your CD drive, change it acc. to your system.

Friday, 29 June 2012

Map a Drive Letter to a Local Folder


(1) Using “subst” command
Under Windows, there is a legacy dos command named “subst”:
C:\>subst /?
Associates a path with a drive letter.


SUBST [drive1: [drive2:]path]
SUBST drive1: /D


drive1: Specifies a virtual drive to which you want to assign a path.
[drive2:]path Specifies a physical drive and path you want to assign to
a virtual drive.
/D Deletes a substituted (virtual) drive.

Type SUBST with no parameters to display a list of current virtual drives.
C:\>

Creating A Map Drive

Goto Start > Run > cmd.exe
Use the command subst <virtual drive name:> <local folder path> to map a new drive to the local folder. Here I have mapped the drive with the name X to a folder in my external hard drive.
map_folder_xp_2
subst x: j:\movies\

Removing A Map Drive

Use the command subst /d <virtual drive name:. The /d switch will delete the virtual mapped drive
map_folder_xp_4
subst /d x:

(2) Visual Subst
Fortunately there is an easier way to utilize this command than having to remember the command line every time you want to use your files. The free windows program Visual Subst will manage these drives for you.

VisualSubst

To Find MAC ADDRESS in Remotely

net view at a command prompt.
Find the name of the machine you want.
nbtstat -a machinename at a command prompt.
MAC address will be at the bottom.

example :
C:\Users\fm>nbtstat -a hostname
 
If you can ping this host over the LAN/WAN, his MAC address will be cached in ARP table of your NIC for a while, so, from command prompt:

c:\ ping 1.2.3.4
after some echo replies from host 1.2.3.4
c:\arp -a
and you will see MAC address of 1.2.3.4

Output like :

C:\Users\fm>arp -a

Interface: 192.168.2.85 --- 0xb
  Internet Address      Physical Address      Type
  169.254.60.189        00-24-81-ee-b8-49     dynamic
  192.168.0.1           01-00-5e-28-00-01     dynamic
  192.168.0.2           78-ac-c0-42-53-7c     dynamic
  192.168.0.5           00-18-71-88-a7-76     dynamic
  
 Open a command window - go to Start > Run and type "command" into the field then click "OK".
  1. Type getmac.
  2. The MAC address will be noted on the column on the left under "Physical Address"
Example C:\>getmac Physical Address Transport Name =================== ============================== 00-D0-B7-B1-A7-14 \Device\Tcpip_{474E507B-4FCD-428C-A553-304B997C4D96}

Tuesday, 26 June 2012

How to map a drive using command prompt


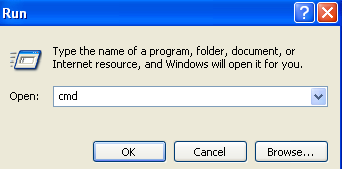
First click on Start and then Run. Type cmd in the Open box.
start run cmd
Then type the following DOS command to map the network drive:
net use x: \\computer name\share name
where x: is the drive letter you want to assign to the shared folder.
net use command
You can delete a mapped network drive using the command prompt by typing in
net use x: /delete
If you have any problems mapping a drive in Windows, post a comment and I’ll try to help you out! Enjoy!